Introduction
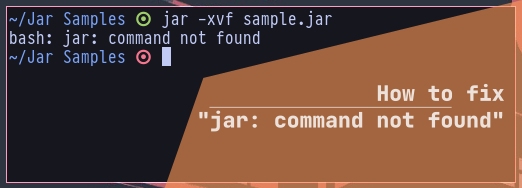
You have a .war or a .jar, or even a .rar file and you’re all ready to extract its inner fruits, but your terminal gives you the back side, “bourne again shell: jar: Command not found”. In another scenario, you’ve got all your clothes stacked, but cannot find the JAR bag to store them (what I mean is to compress some files into a .jar or .war archive). Is this the situation you’re facing? Well, probably you are! Otherwise, why would you even bother coming here?
Relax! I’ll show you all the possible ways of getting your way around, even if you’re sure you have your java directory set right (which I bet is not). But before we head out, there are a couple of things to clarify, so put your ears close! (You can’t see with your ears though.)
Difference between .war, .jar, and .rar
Typically, the main difference between a .jar and .war file is their content. JAR refers to “Java ARchive” and WAR refers to “Web Application Resource”. Which means, .jar is a compilation of a Java application’s source code, while .war is a compiled archive for all the necessary files for a web application. Basically, they are used for easy transfer of a bunch of files that all together form some sort of application.
Both .war and .jar are of the ZIP archive format, so both can be extracted using the same jar command inside of a Linux Terminal. They can also be executed directly as programs using the java command in linux. Therefore, whether it’s a .war or .jar you’re trying to extract, jar will be the command you need.
In contrast, .rar is quite like the boss of its own territory. It is not executable and does one job very well – Compress large files. RAR is exceptionally good at reducing file sizes, providing deep level security with password encryption, and cannot directly be extracted using the jar command. If you wish to extract a .rar file, you better find luck installing a file achiever capable of extracting it.
Let’s not worry about that for now, because out primary task here is to find the missing princess, JAR! So grab your sword and shield (mouse and keyboard) already!
Prerequisites
To find the missing princess, you need to ensure you have the King’s Castle in the first place, which in our case, is the Open Java Development Kit (OpenJDK). This package includes the JAR command.
If you’ve already installed it, recheck twice, skip this step, and head to “Setting your PATH Variable correctly”. I’m pretty sure you messed up at that.
To install OpenJDK, you’d need to use different package managers based on the Linux Distribution you are using. The version of the package mostly doesn’t matter, as long as you’re able to extract the files using it. Some of them are listed below:
Arch Linux
$ sudo pacman -Syu jdk-openjdkUbuntu/Debian
$ sudo apt-get update
$ sudo apt-get install openjdk-17-jdk
Fedora
$ dnf search openjdk
$ sudo dnf install <openjdk-package-name>-devel
For Example:
$ sudo dnf install java-1.8.0-openjdk-devel.x86_64Red Hat
$ yum install java-11-openjdk-develHold your horses before rushing straight to extracting or creating archives! You most probably didn’t save the princess yet. You’re left to pass the dungeon boss. The Demon PATH Variable! (most adventurers die at this point).
Setting your PATH Variable correctly
This is probably the most problematic part, and it’s kind of hard to cover all the possible ways as it may differ from distro to distro, but they mostly follow the same route.
Firstly, if you’re using Arch Linux, this is most likely not an issue. Pacman handles path variables quite well, so you’re most likely not to face any issue if you’ve properly install the OpenJDK package, and are ready to go! (Arch Linux is tough, even Demon PATH doesn’t stand a chance).
Moving on to Debian/Ubuntu based distributions, you need to have two variables set. The first being JAVA_HOME and the second being the PATH Variable.
The following steps are the same across other distros such as Fedora and RedHat, as they are essentially bourne again shell commands, and are relevant across all Linux distributions if you’re using the bourne again shell. The only thing that may vary is the path to the installation folder of openJDK. So make sure you get it right.
Set the JAVA_HOME variable
To set the JAVA_HOME variable, first locate the path where OpenJDK is installed. It is commonly in “/usr/lib/jvm/java-17-openjdk-amd64/“. Once found, execute the following command in a terminal:
$ export JAVA_HOME=/usr/lib/jvm/java-17-openjdk-amd64Or:
$ export JAVA_HOME=/path/to/openJDK/directory/To ensure the variable is successfully set, execute the following command:
$ echo $JAVA_HOME
Set the PATH variable
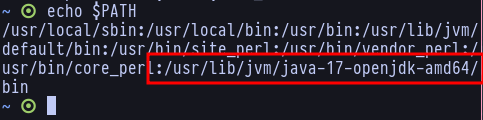
Once you’re done with the JAVA_HOME variable, you need to make sure the global PATH variable includes the bin directory under the openJDK installation folder. Enter the following command to append the bin path to the PATH variable:
$ export PATH=$PATH:$JAVA_HOME/binEnsure that the PATH variable is properly set as well:
$ echo $PATHIt should look something like this:
However, there’s a problem. The next time you re-enter the terminal after having quitted it, you’d no longer be able to run it again. This is because the export command only works on a temporary basis. To make it permanent across terminal sessions, and make sure you don’t have to repeat the command every time, you need to add the same command in your .bashrc file. Bashrc is a configuration file for the Bourne Again Shell, which should be located in your home directory. You can assign commands that directly get executed in bourne again shell when the terminal starts up.
So to make the command permanent, simply add the same command somewhere in your .bashrc file:
export PATH=$PATH:$JAVA_HOME/binIt’ll work for now, but the next time you try using jar after a fresh system reboot, it’ll stop working. Because in order for the appended paths to be persistent across reboots, you need to include the above code in your .bashrc file. So why not do it already?
If you have successfully followed the above steps, you should now be able to execute the following command to see if java and jar are properly set up:
$ java --versionUsing the JAR command
Finally! Oh finally! After successfully saving princess JAR, you’re now ready to execute it. I know you’re sad. But don’t worry, she won’t die when being executed. So give it a try.
Extracting Files
To extract a .jar file, you’d use the following syntax:
$ jar -xvf [filename].jarAnd to extract a .war file, you’d use:
$ jar -xvf [filename].warCreating Archives
To create a .jar archive, you’d use the following syntax:
$ jar cmf jar-file existing-manifest input-file(s)And to create a .war archive, you’d probably use this easy syntax:
$ jar -cvf app.war * And easy workaround if you only need to extract files
If your primary task is not execute or compress files to a .jar or a .war file, and you only need to be able to extract them, you can use another method to do so. As they are essentially made from the ZIP file format, you can extract them simply by using the unzip command in Linux. Install the unzip package in your Linux Distro if you haven’t already using your package manager. It’d shouldn’t be that hard.
Once done, use the following syntax to extract either .jar or .war files using the unzip command:
$ unzip [filename].jarOr:
$ unzip [filename].warAnd Wala! You’ll find your current directory filled with files extracted from the archive.
Common reasons for seeing “jar: command not found”
There are certain cases where “jar: command not found” may still show its face.
Manually Installing OpenJDK, or Installing Oracle JDK
If you’ve built openJDK from the source code, or have installed the Oracle version of JDK found from their official website, it is most likely that your PATH was not set correctly. In this case, you first need to locate your JDK Installation directory and and follow the steps mentioned in “Setting your PATH Variable Correctly”.
Using Jenkins to deploy builds
If you’re using Jenkins to deploy your files, installing openJDK will not work, as Jenkins doesn’t not carry out the initials required for the PATH variable to function when starting the sshd daemon. In such cases, you’d probably want to execute jar using the full path to the installation. The next section explains it.
Executing jar directly from bin folder
If you shed all your sweat trying to set the PATH variable right, but didn’t find luck to successfully execute JAR, the first thing you’d wanna do is reboot your system. Sometimes the PATH variable needs to refresh itself to update all the appending. If it still does not work, the only way left for you to carry out a task with jar is to execute it directly from the bin folder. Here’s how you do it:
$ /path/to/openJDK/bin/jar -xvf /path/to/archiveYou can compress files into archives the same way too. Just make sure you include the full path to the jar executable and change the -xvf to the commands used for archiving.
Conclusion
Therefore, after all this horrible mess, I’m hopefully that you live happily ever after with princess JAR! Her father Java should be so fond of you, that he may even allow you to execute king Java himself! Which in turn, will allow you to run some nice Java Programs. Nevertheless, the next time you see “jar: command not found” appear, know that you’ve got your PATH variable wrong and execute the jar executable directly from the bin folder, if needed.