Introduction
It hasn’t been long since XCode had announced a feature that could delight a lot of coding souls. It has now a dedicated Vim Mode, that can be accessed from the toolbar without any use of any plugins at all! Oh my! This gives rise to amazing possibilities, the most important of which being the fact that it’ll allow the developers to ripe the fruits of Xcode’s auto completion engine, while using Vim keybindings to do so!
As this addition is still quite in its infancy, there’s a lot left to be implemented. It is not as vast and as capable as the genuine Vim, but is enough to cheer up the bored fingers of a lot of developers using XCode as their primary IDE.
Why use Vim Mode in Xcode?
Simple questions have simple answers. Vim is a beast in Text Manipulation, and you don’t have the slightest of idea what you could do with Vim, if you’re still not familiar with it. Vim is all about using your keyboard to manipulate text, the most impactful of which in Xcode is the Visual Mode. What it allows you is to select strings of text in a more approachable way without having to use your mouse! Yes, you can already do pretty much the same using Shift + Arrow keys, but it is not at all as featureful and applicable as compared to Visual Mode.
That is not all, however. There’s more to using the Vim Mode. And you’ll find out just why once you start using it yourself!
Enable Vim Mode in Xcode
Enabling the Vim Mode is as simple as it could ever get. Initially, it had to be enabled from the preferences menu, and it went down a long chain of bread crumbs to finally enable it. The developers behind Xcode where kind enough to make it easier and faster to switch between Vim Mode and the default, in case you need to.
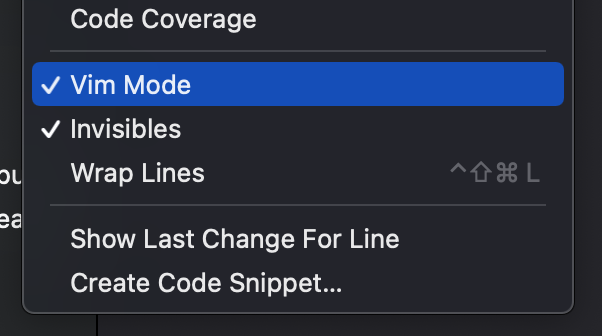
At present, to enable the Vim Mode, navigate your mouse to the Editor Menu, and select Vim Mode, from there. It should look something like this:
Vim commands that work in Xcode
Ahem, Ahem. Trust me. It’s hard to explain. A lot of the cool features don’t work, at least as of now. If you’re a Vim Power User expecting to see all your goodies in Vim here in XCode, and are deciding to make a switch, don’t do it just yet. You’d regret it. Nevertheless, if you are new to Vim and don’t really bother about all the powerful commands, you’d definitely love the features Vim Mode in Xcode has to offer.
Here’s a very short list of commands that currently work in Vim Mode for Xcode:
- All basic as well as advanced motion commands.
- Character jumping with f[character] and t[character].
- Cursor positioning commands such as H, M, L, etc.
- Viewport position commands such as Ctrl + y, Ctrl + e, zz, zd, zt, z., z<enter>, etc.
- 3 modes are available in total – Normal Mode, Insert Mode, and Visual Mode.
- Search commands, including gE.
- Undo and Redo Commands with u and Ctrl + r.
- Registers are accessible in Insert Mode via Ctrl + r.
- Most deleting commands are available
- Yanking and pasting commands
- And a few others…
Vim features that’re not in Xcode
This might seem harsh, due to the large number of important features that don’t work. But if it really bothers you, why not simply use the regular Vim instead? Anyways, let’s move on to list of some of the commonly used cool features in Vim, which are not available in XCode Vim Mode yet:
- Command Mode (This gives rise to a lot of other shortcomings)
- The :g command (nooo……)
- Vim Macros
- Registers only work in Insert Mode..
- Substitution Commands.
- Vim Folds
- Multi-windows (Although the XCode interface should be able to do that itself).
- Abbreviations
- Key mappings cannot be assigned
- Leader key cannot be changed (Use of leader key is still limited, however)
- The Dot command
- No Plugins support
- No Vimrc configuration file can be used just yet. It is complementary to the fact that there isn’t a Command Mode.
I don’t really think I’ll need to include anything else. That’s more than enough to hurt Vim Pros.
A brief guide for Beginners
If you’re unfamiliar with what Vim is in the first place, this quick guide should lead you down some path. This wouldn’t be enough to guide you through all the basics that are to the least, available in Vim Mode for XCode, but should be enough to get you started.
The most common thing you should keep in mind is the fact that you don’t directly type and insert text in Vim Mode as you will do elsewhere, or simply, in your regular Xcode sessions with Vim Mode disabled. You’ll be given different sets of commands which allow you to do specific tasks, without needing to leave your fingers’ rest position on the keyboard (that’s probably the coolest thing about Vim). This is done by the help of Modes in Vim, and based on the mode you are in, you’ll either Insert text, visually select the text, or carry out some text editing. The three modes for these are the Normal Mode, Insert Mode, and Visual Mode.
The Normal Mode is not actually that normal, because this is where Vim rules. It is the mode where you will first land when you start the editor with Vim Mode enabled. In Normal Mode, you cannot directly insert any text, but you can do loads of other cool stuff like deleting the whole line by just pressing dd. You can move your cursor using the h, j, k, l keys on your keyboard, while you are in Normal Mode. Normal Mode is home to some of the best text navigation commands in all of Text Editor history. You can navigate through whole words by pressing w and b, and also delete the words under your cursor with dw. These are called Vim Motions.
You can learn more about motions in detail some other time, but what you should gain knowledge of right now is how to insert some text, because that is exactly what you’re wondering, I know. You’ll need to first enter the Insert Mode of Vim by pressing “i” on your keyboard. You should be able to notice that your cursor changes shape from fat to thin. Now you can insert text to your heart’s content, restless kiddo! If you’re some with the insertion, you can now leave the Insert Mode by pressing the Esc key. This will bring you back to Normal Mode.
One other thing I’d like to mention is the Visual Mode. This is where you select some text, neither by using your mouse, nor by pressing Shift + Arrow keys (they won’t work in Vim). Instead, you’ll have to change the Mode by pressing “v” on your keyboard. Now, if you move your cursor either by using hjkl keys or the arrow keys, you’ll see that some text is being highlighted, just like it does when you casually select text. You can now use commands that are similar to the Normal Modes command to do what you want with the selected text. You can delete the highlighted text by pressing d, or copy the selected text by pressing y. Afterwards, if you wish to paste the copied commands, you can navigate your mouse to the position you want to paste and then press p on your keyboard.
Wala! You’ve now successfully learned the basics of Vim. If you’ve understood these well, the rest of the journey should not be too hard. This is pretty much where everyone gets stuck. One other problematic part would’ve been to exit out of Vim, if you had used the regular Vim instead of the Vim Mode, inside of Xcode. Nevertheless, if you want to learn more, there are great tutorials on YouTube and elsewhere to help you further down the line. If you’ve liked the experience and are thinking of giving the real Vim a try, waste no time I’d tell ya!
Conclusion
To sum it up, Vim Mode in Xcode is not at all a filler for a Vim Pro’s heart, but for any given user not familiar with Vim, and having used Xcode for most of their coding careers only, will enjoy the experience to the fullest. Vim is hard to learn, and I do agree with that myself. But once you learn the basics, the difference in how things work between the two worlds is huge, one being Vim and the other being all the text editors. Vim is not your regular IDE for code completion and cheezy mouseiness. It is about efficiency. Even Apple has to admit it. Otherwise, why would they even bother adding a mode for it in their proprietary text editor, right?